How is a soil monolith made?
Preparing a soil monolith for display involves extracting the sample from the field, mounting it onto a display board, and fixing the soil to preserve the natural appearance. Soil monoliths can be created using different methods. This page highlights the steps outlined in an NRCS technical resource prepared by Laurie N. Kiniry and Conrad L. Neitsch. For more detailed information see the full document here. A slightly different approach presented here by the Science Education Resource Center at Carleton College.
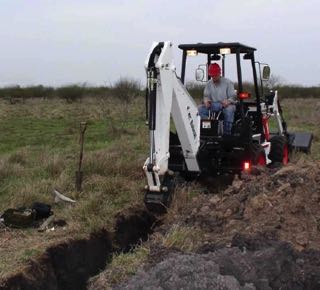
STEP 1: Determine where to take the soil monolith |
|
|
|
The first step is to determine what you want the soil monolith to showcase. Usually the goal is to display soil that is representative of a certain soil type. Then, determine where to take the soil monolith. Keep in mind, you will need 1 – 1.5 m of exposed soil. If you are lucky, there may be a road cut or other vertical exposure already in the landscape. If not, use a backhoe or dig a pit by hand. Avoid hazards (e.g., underground pipes, utility lines) and follow all safety regulations (e.g., a pit deeper than 1.5 m needs shoring). |
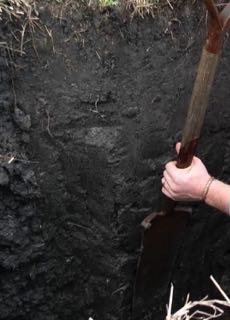
STEP 2: Prepare the soil face |
|
|
|
Clean up the soil face. This surface will eventually become the front of the monolith. Remove any artifacts from the digging process. Knives and spades are the best tools to use. |
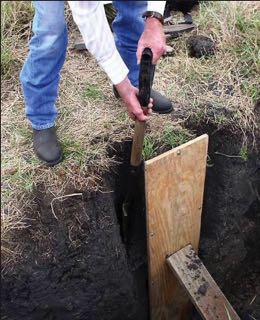
STEP 3: Extract the monolith |
|
|
|
Once the surface is cleaned up, nail a metal frame into the soil. The frame is anchored to the surface and at the bottom of the pit. Cut a groove into the soil profile around the metal frame. Remove the metal frame and you are left with a rectangular section of soil protruding from the profile wall. Attach a collection board consisting of a wooden board with a metal frame. The dimensions of the metal frame will be the same as the final soil monolith. Cut 4-5 inches deep at a 45° angle into the profile to loosen the soil sample from the profile. Remove as much soil as possible. To help secure the soil to the collecting board, drill holes through the soil and thread bungee cords through the backside of the collecting board. Use a spade to loosen the backside of the monolith. Start at the top. Pull the monolith away from the wall and carry the monolith to a flat surface. Take care not to let the soil slide down the board in the process. |
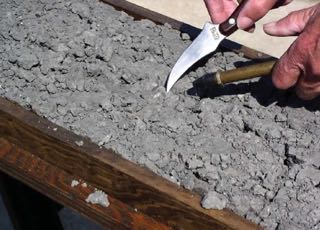
STEP 4: Prepare the monolith face |
|
|
|
Place the sample on a flat surface and remove the excess soil. Use a saw or machete to smooth out the exposed surface. This will become the back of the soil monolith. The rest of the procedure is best done in the lab. Wrap it in plastic for safe transport. The next step is to prepare the plywood mounting board. A bed of nails can be added to help secure the soil to the board. Add a generous layer of glue. Place it on top of the sample and press it down. Turn it over and remove the collecting board. |
STEP 5: Final preparation |
|
|
|
When the soil was extracted, the surface is usually smoothed out in the process, obscuring the physical characteristics. The surface needs to be restored to a natural appearance. Allow the soil to dry for a couple days. Then, pick at the surface to reveal the original structure. The surface can be moistened (but not saturated) to facilitate the process. Small knives, picks and pressurized air can be used to clean up the face of the profile. Let the soil dry and then apply a mixture of water and glue. Add enough glue to wet the soil, but don’t let it pond on the surface. Remove any excess glue on the display board and let the board dry for a couple weeks. |
STEP 6: Set up the display |
|
|
|
Once the monolith is dry, the last step is to prepare the board for display. Add a name plate and other labels as desired. The board can now be hung up for display! |


The images above (except for the last one) were taken from the NRCS technical resource.